nprogram’s blog

気ままに、プログラミングのトピックについて書いていきます

CSSについて

CSSのトピックを書いていきます。

ページ内で複数同じスタイルを定義する場合は、クラスセレクタの使用が有効です。

書き方はピリオド + 半角文字です。

.parent {
    display:inline-block;
}

要素を横並び

要素を横並びにする方法は、display:inline-blockが有効です。 このインラインブロック、display:inlineが指定されたインライン要素とは異なり、幅と高さを持ち、行をまたがないという特徴を持ちます。 その名の通り、文中に入るブロック要素のような存在です。

イメージ f:id:nprogram:20160718100437p:plain

<!DOCTYPE html>
<html lang="ja">
<head>
    <title> HTML CSS テスト </title>
    <link href="app.css" rel="stylesheet" />
</head>

<body>
    <ul>
        <li class="parent">
            <p>テストパラメータ : </p>
        </li>
        <li class="parent">
            <p>1234</p>
        </li>
    </ul>
</body>
</html>
.parent {
    display:inline-block;
}

これ以降、コードはbody要素の中身のみ記載。

要素を中央合わせ

margin: autoで中央寄せ margin: auto;を使って上下左右中央寄せにします。 ※中央寄せしたい要素の幅、高さを指定しないと親要素のサイズに合わせて伸びてしまうので注意。

こちらのサイトがとても分かりやすく書いてあります。

qiita.com

IE9で点滅処理

IE9で、要素を点滅させる必要が発生して、かなり困っている。 一応MARQUEEタグを使用すれば、点滅処理はさせられるだが・・・。

<marquee scrolldelay="280" scrollamount="20" width="20">
    <img src="/Images/icn.png" />
</marquee>

IE9は点滅をサポートしませんとしたい・・・。IE10より上では、animationを用いて点滅可能です。

.blinking{
    -webkit-animation:blink 1.5s ease-in-out infinite alternate;
    -moz-animation:blink 1.5s ease-in-out infinite alternate;
    animation:blink 1.5s ease-in-out infinite alternate;
}
@-webkit-keyframes blink{
    0% {opacity:0;}
    100% {opacity:1;}
}
@-moz-keyframes blink{
    0% {opacity:0;}
    100% {opacity:1;}
}
@keyframes blink{
    0% {opacity:0;}
    100% {opacity:1;}
}
Knockout Custom ComponentをTypeScriptで記述

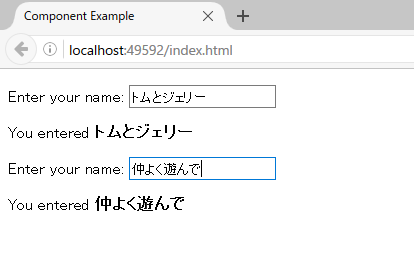
実行イメージ

f:id:nprogram:20160715072126p:plain

注意ポイント

Windowオブジェクトのonloadイベントハンドラにおいて、 applyBindings関数呼び出し前に、先にComponentを登録しておきましょう。 (以下の例では、"name-editor" という名前のComponent)

なお、Knockout.jsのapplyBindings関数とは、Knockout.jsをアクティブ化する(ビューモデルとビューを関連付ける)ためのものです。

<!DOCTYPE html>
<html lang="ja">
<head>
    <title> Component Example </title>
    <script src="Scripts/knockout-3.4.0.debug.js"></script>
    <script src="app.js"></script>

    <script type="text/html" id="my-component-templete">
        <p>Enter your name: <input data-bind='value: name' /></p>
        <p>You entered <strong data-bind='text: name()'></strong></p>
    </script>
</head>

<body>
    <name-editor params="value: 'hello world'"></name-editor>
    <div data-bind="component: { name: 'name-editor', params: { value: 'hoge bar' } }"></div>
</body>
</html>
/// <reference path="scripts/typings/knockout/knockout.d.ts" />

class ViewModel{

    name: KnockoutObservable<string> = ko.observable<string>();
    constructor(params: any) {
        this.name(params.value);
    }
}

// MyViewModelメソッド
class MyViewController {
    constructor() { }
}

// Windowオブジェクトのonloadイベントハンドラに、JavaScriptコードを登録します。
window.onload = function () {

    // ko.components.register を使い "name-editor" という名前のComponentを登録しています。
    ko.components.register('name-editor', {
        viewModel: ViewModel,
        template: { element: 'my-component-templete' }
    });

    ko.applyBindings(new MyViewController());
};

Knockout Tutorial Creating custom bindings

はじめに

Knockoutの公式ページ[http://knockoutjs.com/]

のTutorialであるCreating custom bindingsをTypeScriptを使って記載しています。

また、ソースコードは、GitHubにアップロードしております。 GitHub - a143321/Knockout-Tutorial-Creating-custom-bindings: Knockout Tutorial Creating custom bindings

Tutorial 実行イメージ

  • ボタン有効時 f:id:nprogram:20160713081106p:plain

  • ボタン無効時 f:id:nprogram:20160713081134p:plain

ポイント

(1) このプロジェクト実行には、knockoutとjqueryのライブラリのインストールが新規に必要です。 f:id:nprogram:20160711063114p:plain

(2) htmlファイルに次のインクルード文を追加しましょう。 (※ただし、パスは、ライブラリをインストールした箇所、Versionは、ライブラリのVersionとなるので注意)

(3) ライブラリのインポート順序に注意。誤るとプログラムが正しく動作しません。

jQuery UIは、jQueryプラグインであるため、ライブラリをインポートするためには、 jQueryjQuery UIの順番で、ライブラリをインポートする。

    <script src="Scripts/jquery-3.0.0.js"></script>

    <link type="text/css" rel="stylesheet"
          href="http://code.jquery.com/ui/1.10.3/themes/cupertino/jquery-ui.min.css" />
    <script type="text/javascript"
            src="http://code.jquery.com/jquery-1.9.1.min.js"></script>
    <script type="text/javascript"
            src="http://code.jquery.com/ui/1.10.3/jquery-ui.min.js"></script>

    <script src="Scripts/knockout-3.4.0.js"></script>
    <script src="app.js"></script>

KnockoutComputedプロパティをJavaScript記載からTypeScript記載に変換!2

はじめに

Knockoutの公式ページ[http://knockoutjs.com/]

のTutorialであるWorking with Lists and CollectionsをTypeScriptを使って記載しています。ソースコードは、GitHubにアップしています。

Visual Studioを使ったデバッグ方法

今回はVisual Studioを用いたデバッグ方法について記載します。 まずは、いつものように、 Knockout Tutorial Working with Lists and Collectionsの JavaScriptソースコードをTypeScriptに書き直します。

<Knockout Tutorial Working with Lists and Collectionsのソースコード

    self.formattedPrice = ko.computed(function() {
        var price = self.meal().price;
        return price ? "$" + price.toFixed(2) : "None";        
    });    
}

<上記ソースコードをTypeScriptに書き直したもの(バグあり)>

    formatterPrice: KnockoutComputed<string> = ko.computed(() => {
        var price = this.meal().price;
        return price ? "$" + price.toFixed(2) : "None";
    }); 
}

これをVisual Studioで実行すると、エラーで止まります。 エラー内容は、未定義またはNULL参照のプロパティ'price'は取得できません。

f:id:nprogram:20160627215739p:plain

これだけ見てもさっぱりわからないので、解析に移ります。 まず、プログラムが止まっている箇所は、var price = this.meal().price;の行です。 このときのthis.mealの値を確認してみましょう。 イミディエイトウィンドウを使います。 [イミディエイト] ウィンドウは、式のデバックと評価、ステートメントの実行、変数値の出力などのために使用します。 なお、デバッグ時にしか、使用できません。

this.mealと入力すると、undefinedと返ってきました。 初回のformatterPriceが呼び出されたときは、this.mealはundefinedのようです・・・。

f:id:nprogram:20160627220513p:plain

今度は、KnockoutComputed型のformatterPriceプロパティが正しく動作しているか確認します。 (this.meal()の中身を確認するために、JSON.stringifyを使用)

    formatterPrice: KnockoutComputed<string> = ko.computed(() => {
        //var price = this.meal().price;
        //return price ? "$" + price.toFixed(2) : "None";
        return JSON.stringify(this.meal());
    });

実行すると、正しく設定が表示されました。

f:id:nprogram:20160627221814p:plain

次は、実行順序を確認します。 下記のように、SeatReservationクラスのインスタンスを生成(new)している箇所と this.mealを初期化しているSeatReservationのコンストラクタと var price = this.meal().price;の行にブレークポイントを仕掛けます。 f:id:nprogram:20160627222223p:plain

この状態で実行すると、なんということでしょう。 SeatReservationクラスのコンストラクタの初期化処理this.meal(item);が実行される前に、 KnockoutComputed型のformatterPriceプロパティの処理が実行されています。 つまり、コンストラクタ内の初期化処理に入る前に、 KnockoutComputed型のformatterPriceプロパティの処理が実行されていることが今回のバグの原因です。

対策

対策としては、this.meal()がundefinedの場合は、"None"で返すのがベストです。 なお、this.mealとするとメソッドそのものを指してしまうので、誤りです。

<上記ソースコードをTypeScriptに書き直したもの(正常動作するもの)>

    formatterPrice: KnockoutComputed<string> = ko.computed(() => {
        if ( this.meal() === undefined ) {
            return "None";
        }
        else {
            var price = this.meal().price;
            return price ? "$" + price.toFixed(2) : "None";
        }
    });

正常に実行された結果は以下のとおり。 なお、Standard(sandwich)のPriceは、ここでは、10ドル(元はNone)に設定しております。

f:id:nprogram:20160627225419p:plain

まとめ

原因不明のバグにぶつかったときには、以下の方法が有効です。

  • デバッグ時に、イミディエイトウィンドウを用いて変数値を出力させる
  • ブレークポイントを複数セットして、処理の実行順序が期待通りか確認する
  • JSON.stringifyメソッドを使用して、変数の中身を表示させる

KnockoutComputedプロパティをJavaScript記載からTypeScript記載に変換!

はじめに

Knockoutの公式ページ[http://knockoutjs.com/]

のTutorialであるWorking with Lists and CollectionsをTypeScriptを使って記載しています。ソースコードは、GitHubにアップしています。

KnockoutComputedプロパティ

型を意識しないといけないので、注意しましょう。例のごとく、私は詰まりました。

computed() に渡された評価関数を実行する。 実行中に呼び出された Obervable を依存対象として記録するため、正常に動作するためには、 以下の例では、KnockoutObservableArrayプロパティであるseatsが定義されている必要があります。

self.totalSurcharge = ko.computed(function() {
   var total = 0;
   for (var i = 0; i < self.seats().length; i++)
       total += self.seats()[i].meal().price;
   return total;
});
seats: KnockoutObservableArray<SeatReservation> = ko.observableArray<SeatReservation>();

totalSurcharge: KnockoutComputed<number> = ko.computed(() =>
    {
        var total = 0;
        for (var i = 0; i < this.seats().length; i++)
            total += this.seats()[i].meal().price;
        return total;
    });

computed の仕組みについては以下のサイトがおすすめです。

Knockout.js 使い方メモ - Qiita

thisの扱いに注意! [TypeScript][Knockout]

thisの扱いに要注意!!

removeSeatメソッドの箇所で、以下のエラーメッセージが表示。

app.ts:42 Uncaught TypeError: Cannot read property 'remove' of undefined

    removeSeat = (seat: SeatReservation) => {
        this.seats.remove(seat);
    }

f:id:nprogram:20160619222025p:plain

原因

clickイベントに登録されたメソッド(ここでは、removeSeatのこと)のthisは、イベントの発生源のオブジェクトを参照してしまうことが原因でした。

対策

そこで、上記のメソッドをプロパティに置き換え、アロー関数を使って初期化する方法を採用しました。

    removeSeat = (seat: SeatReservation) => {
        this.seats.remove(seat);
    }

このようにすることで、下記コードのように、コンパイルされたJavaScript結果は、 thisを「_this」に退避 していることがわかります。 これにより、clickイベントに登録されたメソッドであっても、thisが期待値どおり「this.seats」を指し示すことができます。

var ReservationsViewModel = (function () {
    function ReservationsViewModel() {
        var _this = this;
        this.seats = ko.observableArray();
        // Non-editable catalog data - would come from the server
        this.availableMeals = [
            { mealName: "Standard (sandwich)", price: 0 },
            { mealName: "Premium (lobster)", price: 34.95 },
            { mealName: "Ultimate (whole zebra)", price: 290 }
        ];
        this.removeSeat = function (seat) {
            _this.seats.remove(seat);
        };
        this.seats.push(new SeatReservation("Steve", this.availableMeals[0]));
        this.seats.push(new SeatReservation("Bert", this.availableMeals[1]));
        this.seats.push(new SeatReservation("Tom", this.availableMeals[2]));
    }
    // Operations
    ReservationsViewModel.prototype.addSeat = function () {
        this.seats.push(new SeatReservation("", this.availableMeals[0]));
    };
    return ReservationsViewModel;
})();
  • ソースコード全文を以下に記載します
/// <reference path="scripts/typings/knockout/knockout.d.ts" />

// Class to represent a row in the seat reservations grid
class SeatReservation{

    meal: KnockoutObservable<availableMeals> = ko.observable<availableMeals>();


    constructor(public name: string, item: availableMeals) {
        this.meal(item);
    }
}

interface availableMeals{
    mealName: string;
    price: number;
}
// Overall viewmodel for this screen, along with initial state
class ReservationsViewModel {

    seats: KnockoutObservableArray<SeatReservation> = ko.observableArray<SeatReservation>();

    // Non-editable catalog data - would come from the server
    availableMeals = [
        { mealName: "Standard (sandwich)", price: 0 },
        { mealName: "Premium (lobster)", price: 34.95 },
        { mealName: "Ultimate (whole zebra)", price: 290 }
    ];

    constructor() {
        this.seats.push(new SeatReservation("Steve", this.availableMeals[0]));
        this.seats.push(new SeatReservation("Bert", this.availableMeals[1]));
        this.seats.push(new SeatReservation("Tom", this.availableMeals[2]));
    }

    // Operations
    addSeat() {
        this.seats.push(new SeatReservation("", this.availableMeals[0]));
    }

    removeSeat = (seat: SeatReservation) => {
        this.seats.remove(seat);
    }
}


window.onload = () => {
    var viewModel = new ReservationsViewModel();
    ko.applyBindings(viewModel);
}
<!DOCTYPE html>

<html lang="en">
<head>
    <meta charset="utf-8" />
    <title>KnockOut And TypeScript</title>
    <link rel="stylesheet" href="app.css" type="text/css" />
    <script src="Scripts/knockout-3.4.0.js"></script>
    <script src="app.js"></script>
</head>
<body>
    <h2>Your seat reservations</h2>

    <table>
        <thead>
            <tr>
                <th>Passenger name</th>
                <th>Meal</th>
                <th>Surcharge</th>
                <th></th>
            </tr>
        </thead>
        <tbody data-bind="foreach: seats">
            <tr>
                <td><input data-bind="value: name" /></td>
                <td><select data-bind="options: $root.availableMeals, value: meal, optionsText: 'mealName'"></select></td>
                <td data-bind="text: meal().price"></td>
                <td><a href="#" data-bind="click: $root.removeSeat">Remove</a></td>
            </tr>
        </tbody>
    </table>
    <button data-bind="click: addSeat">Reserve another seat</button>
</body>
</html>

参考サイト

この問題解決には、以下のサイトを拝見させていただき、解決することができました。 本当にありがとうございます。

http://kuroeveryday.blogspot.jp/2015/04/this.html

http://kojs.sukobuto.com/tips/withTypeScript

Visual Studio Codeを用いたTypeScriptのコンパイル方法について [TypeScript]

Visual Studio Codeをインストールしましょう

まずはホームページからVisual Studio Codeをダウンロードしてきます。

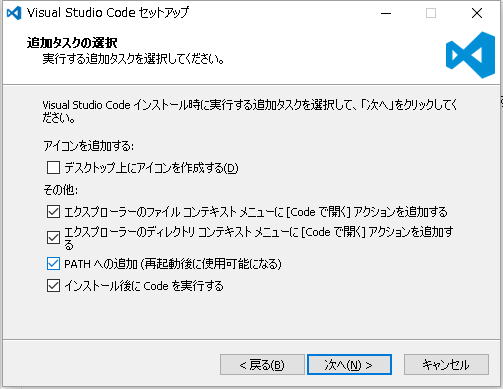
そして、以下のように、エクスプローラー関連のチェックボックスにチェックを入れてインストールしてください。

f:id:nprogram:20160621225242p:plain

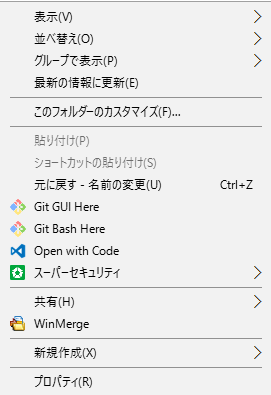
次に、適当なフォルダ[例]C:\VSCODE_TypeScriptを作成してフォルダ内で右クリックしてOpen with Codeをクリックします。

f:id:nprogram:20160621225823p:plain

その後、画面上で、Ctrl+Shift+Cか右クリック(コマンドプロンプトで開く)で、コマンドプロンプトを開きます。 この操作をすると、このフォルダ階層C:\VSCODE_TypeScriptでコマンドプロンプトが開かれます。

Node.jsでJavaScriptコードを実行しましょう

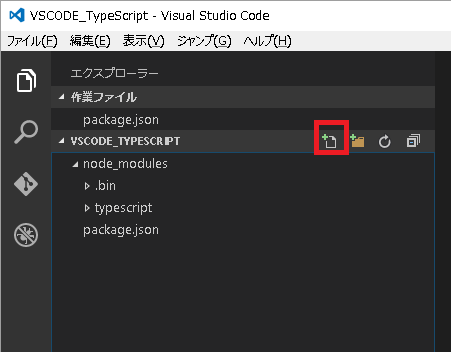
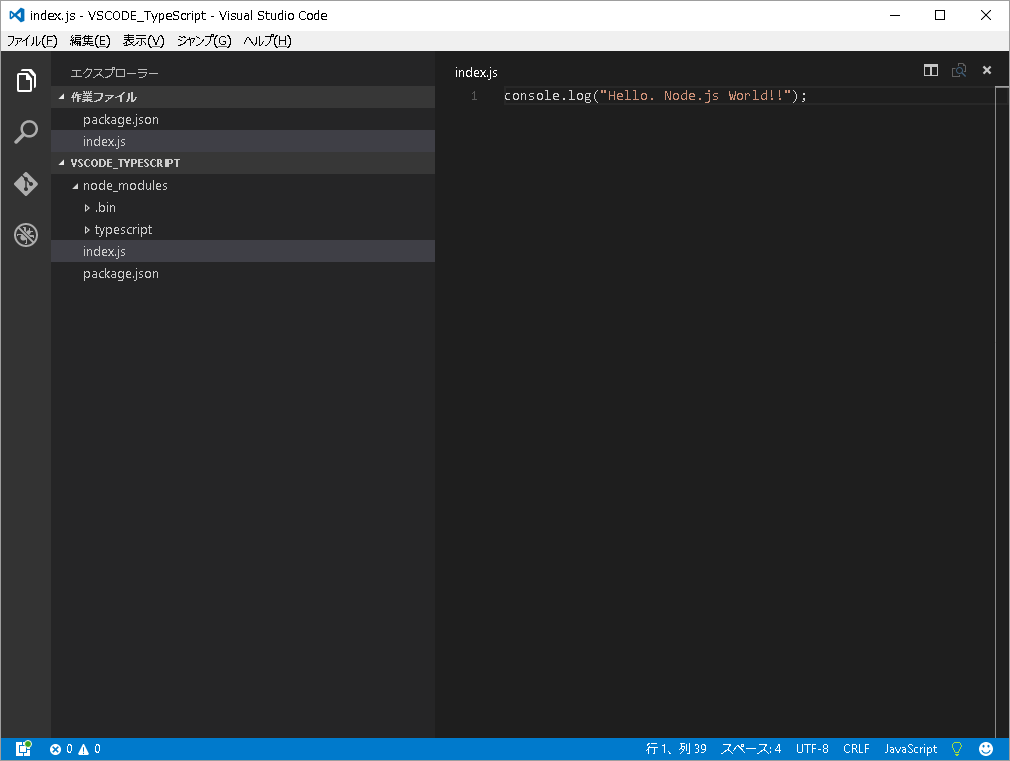
試に、簡単なJavaScriptプログラムを実行して、node.jsを使って実行できるかテストします。 VSCODE_TYPESCRIPTフォルダ階層の横で、ファイルボタンを押して、index.jsファイルを作成します。

f:id:nprogram:20160621231934p:plain

次に、index.jsファイルには、'console.log("Hello. Node.js World!!");'と記載してください。

f:id:nprogram:20160621232507p:plain

最後に、コマンドプロンプト上で、node index.jsを実行すると、Hello. Node.js World!!が表示されます。

f:id:nprogram:20160621233125p:plain

npmを用いて、TypeScriptコンパイラをインストールしましょう

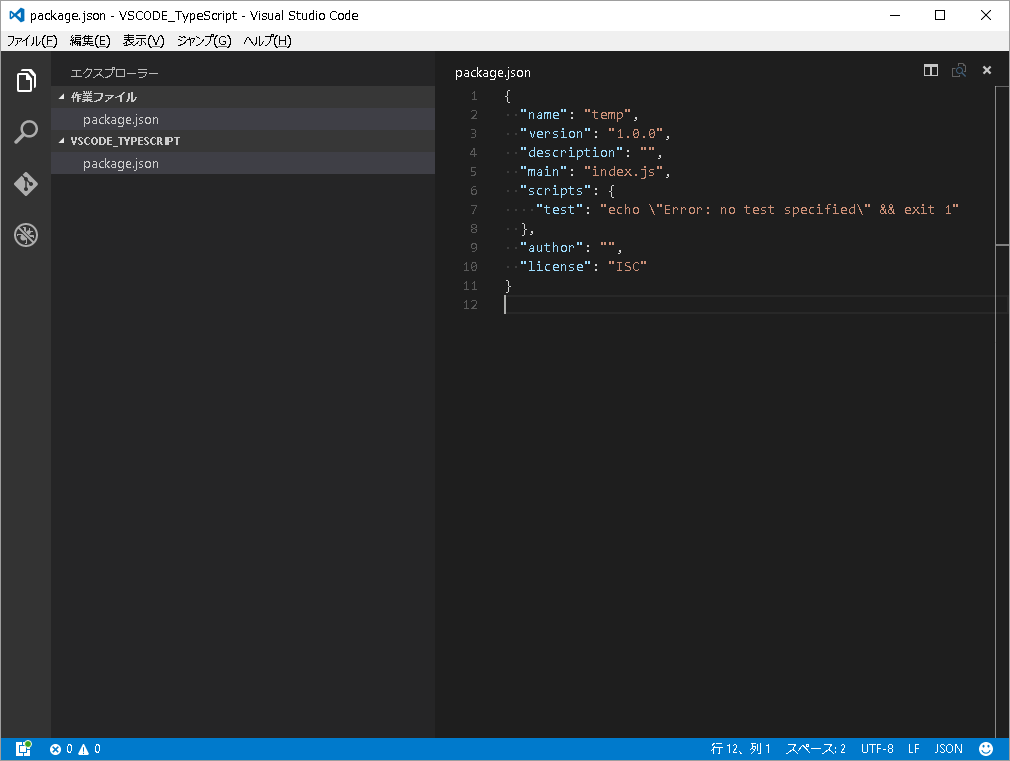
npmコマンドnpm initを実行してpackage.jsonファイルを生成します。 nameは適当な値を入力して、あとはEnterを連打してください。

なお、npmコマンドを使用するためには、先に、node.jsをインストールする必要があります。

package.jsonファイルが生成されました。

f:id:nprogram:20160621231214p:plain

次に、TypeScriptコンパイラをnpmコマンドを用いてインストールします。

次のように入力してください。npm install typescript --save-dev

--save-devはinstallしたlibraryの情報を自動でpackage.jsonに書いてくれるoptionです。

TypeScriptコードをビルドして実行しましょう

先ほどのindex.jsファイルを削除して、同じフォルダ階層にindex.tsファイルを作成して以下のように記述してください。

class Main  // classを指定してクラス化 
{ 
    // コンストラクター 
    constructor() 
    { 
        console.log("Hello! Node.js × TypeScript from Class"); 
    } 
} 

// Mainクラスのインスタンスを作る 
var main:Main = new Main(); 

次に、コマンドプロンプト上で、node_modules\\.bin\\tsc index.tsと入力すると、 index.jsファイルがindex.tsと同じ階層に作られます。 次に、node index.jsを実行すると以下のように表示されます。

f:id:nprogram:20160621234340p:plain

package.jsonの記述で、ビルドして実行をしましょう

package.jsonファイルを以下のように修正します。 修正した箇所は、scriptsフィールドの箇所のみ。

{
  "name": "temp",
  "version": "1.0.0",
  "description": "",
  "main": "index.js",
  "scripts": {
    "test": "echo \"Error: no test specified\" && exit 1",
    "build":"node_modules/.bin/tsc index.ts",
    "start":"node index.js"
  },
  "author": "",
  "license": "ISC",
  "devDependencies": {
    "typescript": "^1.8.10"
  }
}

index.jsファイルを削除して、コマンドプロンプト上で、npm run buildを入力すると、ビルドが実行されます。 index.jsファイルが生成されるので、コマンドプロンプト上で、'npm run start'を入力すると、JavaScriptコードが実行されます。

f:id:nprogram:20160622000214p:plain

では、次は、ビルドと実行を一度に行いましょう。 scriptsフィールドに'prestart'を追加します。jsonファイルには、以下のように記載します。

{
  "name": "temp",
  "version": "1.0.0",
  "description": "",
  "main": "index.js",
  "scripts": {
    "test": "echo \"Error: no test specified\" && exit 1",
    "build":"node_modules/.bin/tsc index.ts",
    "start":"node index.js",
    "prestart":"node_modules/.bin/tsc index.ts"
  },
  "author": "",
  "license": "ISC",
  "devDependencies": {
    "typescript": "^1.8.10"
  }
}

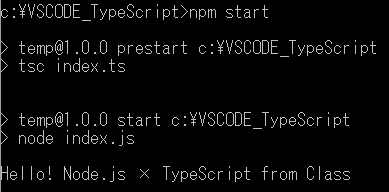
npm startをコマンドプロンプト上で実行すると、ビルドと実行を同時に行うことができます。

f:id:nprogram:20160622002130p:plain

tsconfig.jsonファイルを用いて、ビルドを制御しよう。

sconfig.jsonファイルを生成するためにコマンドプロンプトにnode_modules\\.bin\\tsc --initと入力します。

続きはまた書きます。

npmコマンド学習サイト

以下のページを用いて、私も学習していきます。