Gridコントロール
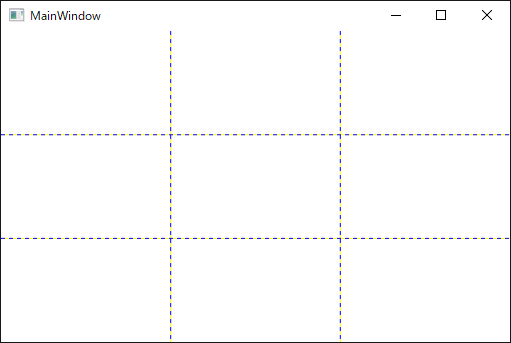
Gridコントロールを使えば、コントロールの配置を簡単に決めることできます。 3行、3列のGridを作成する場合は以下のように指定します。

<Window x:Class="GridBox.MainWindow"
        xmlns="http://schemas.microsoft.com/winfx/2006/xaml/presentation"
        xmlns:x="http://schemas.microsoft.com/winfx/2006/xaml"
        xmlns:d="http://schemas.microsoft.com/expression/blend/2008"
        xmlns:mc="http://schemas.openxmlformats.org/markup-compatibility/2006"
        xmlns:local="clr-namespace:GridBox"
        mc:Ignorable="d"
        Title="MainWindow" Height="350" Width="525">
    <Grid ShowGridLines="True">
        <!-- 行を3つ定義 -->
        <Grid.RowDefinitions>
            <RowDefinition Height="1*"/>
            <RowDefinition Height="1*"/>
            <RowDefinition Height="1*"/>
        </Grid.RowDefinitions>
        <!-- 列を3つ定義 -->
        <Grid.ColumnDefinitions>
            <ColumnDefinition Width="1*"/>
            <ColumnDefinition Width="1*"/>
            <ColumnDefinition Width="1*"/>
        </Grid.ColumnDefinitions>
    </Grid>
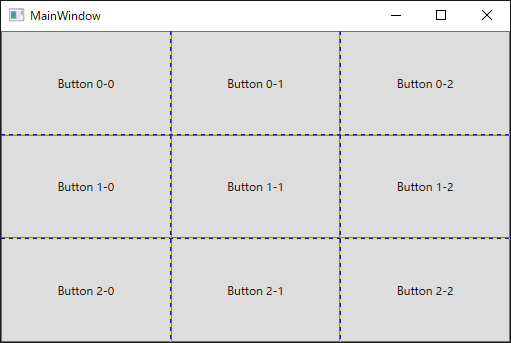
以下のように、Grid.RowとGrid.Columnを指定することで、Gridの意図した箇所にコントロールをセット可能です。

<Window x:Class="GridBox.MainWindow"
        xmlns="http://schemas.microsoft.com/winfx/2006/xaml/presentation"
        xmlns:x="http://schemas.microsoft.com/winfx/2006/xaml"
        xmlns:d="http://schemas.microsoft.com/expression/blend/2008"
        xmlns:mc="http://schemas.openxmlformats.org/markup-compatibility/2006"
        xmlns:local="clr-namespace:GridBox"
        mc:Ignorable="d"
        Title="MainWindow" Height="350" Width="525">
    <Grid ShowGridLines="True">
        <!-- 行を3つ定義 -->
        <Grid.RowDefinitions>
            <RowDefinition />
            <RowDefinition />
            <RowDefinition />
        </Grid.RowDefinitions>
        <!-- 列を3つ定義 -->
        <Grid.ColumnDefinitions>
            <ColumnDefinition />
            <ColumnDefinition />
            <ColumnDefinition />
        </Grid.ColumnDefinitions>

        <Button Content="Button 0-0" Grid.Row="0" Grid.Column="0" />
        <Button Content="Button 1-0" Grid.Row="1" Grid.Column="0" />
        <Button Content="Button 2-0" Grid.Row="2" Grid.Column="0" />
        <Button Content="Button 0-1" Grid.Row="0" Grid.Column="1" />
        <Button Content="Button 1-1" Grid.Row="1" Grid.Column="1" />
        <Button Content="Button 2-1" Grid.Row="2" Grid.Column="1" />
        <Button Content="Button 0-2" Grid.Row="0" Grid.Column="2" />
        <Button Content="Button 1-2" Grid.Row="1" Grid.Column="2" />
        <Button Content="Button 2-2" Grid.Row="2" Grid.Column="2" />
    </Grid>
</Window>
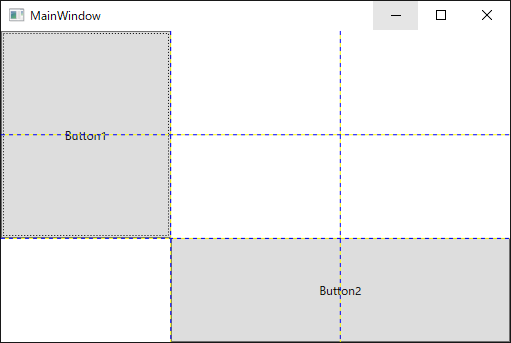
以下のように、Grid.RowSpanを設定することで、何行にわたって要素を置くか設定可能です。
また、Grid.ColumnSpanを設定することで、何列にわたって要素を置くか設定可能です。

<Window x:Class="GridBox.MainWindow"
        xmlns="http://schemas.microsoft.com/winfx/2006/xaml/presentation"
        xmlns:x="http://schemas.microsoft.com/winfx/2006/xaml"
        xmlns:d="http://schemas.microsoft.com/expression/blend/2008"
        xmlns:mc="http://schemas.openxmlformats.org/markup-compatibility/2006"
        xmlns:local="clr-namespace:GridBox"
        mc:Ignorable="d"
        Title="MainWindow" Height="350" Width="525">
    <Grid ShowGridLines="True">
        <!-- 行を3つ定義 -->
        <Grid.RowDefinitions>
            <RowDefinition Height="1*"/>
            <RowDefinition Height="1*"/>
            <RowDefinition Height="1*"/>
        </Grid.RowDefinitions>
        <!-- 列を3つ定義 -->
        <Grid.ColumnDefinitions>
            <ColumnDefinition Width="1*"/>
            <ColumnDefinition Width="1*"/>
            <ColumnDefinition Width="1*"/>
        </Grid.ColumnDefinitions>

        <Button Content="Button1" Grid.Row="0" Grid.Column="0" Grid.RowSpan="2"/>
        <Button Content="Button2" Grid.Row="2" Grid.Column="1" Grid.ColumnSpan="2"/>
    </Grid>
</Window>