以下のページが参考になりそう。
- DependencyProperty(依存関係プロパティ) tawamuredays.blog.fc2.com
WPFで、自作イベントを作成する方法を調べてみました。
以下のサイトを参考にさせていただきました。
方法 : カスタム ルーティング イベントを作成する https://docs.microsoft.com/ja-jp/dotnet/framework/wpf/advanced/how-to-create-a-custom-routed-event
方法 : ルーティング イベントを処理する https://docs.microsoft.com/ja-jp/dotnet/framework/wpf/advanced/how-to-handle-a-routed-event
ルーディングイベントとは
https://msdn.microsoft.com/ja-jp/library/ms742806(v=vs.100).aspx
あと、tocsworld 様のCLRイベントとWPF Routedイベントの違いの記事はすごく勉強になります。 tocsworld.wordpress.com
あと、英語のページだけどこれもよさげ。 www.c-sharpcorner.com
繰り返し使用するUI部品は、UserControlにして何度も使用できるようにしたほうが便利です。
例えば、MainWindow.xamlを以下のように記載した場合、同じような表記が繰り返し発生します。
これをUserControlに置き換えます。
<Window x:Class="WpfApp5.MainWindow"
        xmlns="http://schemas.microsoft.com/winfx/2006/xaml/presentation"
        xmlns:x="http://schemas.microsoft.com/winfx/2006/xaml"
        xmlns:d="http://schemas.microsoft.com/expression/blend/2008"
        xmlns:mc="http://schemas.openxmlformats.org/markup-compatibility/2006"
        xmlns:local="clr-namespace:WpfApp5"
        mc:Ignorable="d"
        Title="MainWindow" SizeToContent ="WidthAndHeight">
    <StackPanel Width="Auto" Height="Auto" Margin="10">
        <StackPanel Orientation="Horizontal" Margin="10">
            <TextBlock Text="Name : "/>
            <TextBlock Text="Ichiro"/>
            <Button Content="Show Message"/>
        </StackPanel>
        <StackPanel Orientation="Horizontal" Margin="10">
            <TextBlock Text="Name : "/>
            <TextBlock Text="Jiro"/>
            <Button Content="Show Message"/>
        </StackPanel>
        <StackPanel Orientation="Horizontal" Margin="10">
            <TextBlock Text="Name : "/>
            <TextBlock Text="Saburo"/>
            <Button Content="Show Message"/>
        </StackPanel>
    </StackPanel>
</Window>
ユーザーコントロールは以下のようにプロジェクトに追加します。
プロジェクトのプロパティで、追加を選択して、ユーザーコントロールを選択。

次に、ユーザーコントロールのxamlファイルを以下のように書き換えて、
<UserControl x:Class="WpfApp5.UserControl1"
             xmlns="http://schemas.microsoft.com/winfx/2006/xaml/presentation"
             xmlns:x="http://schemas.microsoft.com/winfx/2006/xaml"
             xmlns:mc="http://schemas.openxmlformats.org/markup-compatibility/2006"
             xmlns:d="http://schemas.microsoft.com/expression/blend/2008"
             xmlns:local="clr-namespace:WpfApp5"
             mc:Ignorable="d"
             d:DesignHeight="300" d:DesignWidth="300">
    <StackPanel Orientation="Horizontal" Margin="10">
        <TextBlock Text="Name : "/>
        <TextBlock Text="Ichiro"/>
        <Button Content="Show Message"/>
    </StackPanel>
</UserControl>
MainWindow.xamlも以下のように書き換えます。
<Window x:Class="WpfApp5.MainWindow"
        xmlns="http://schemas.microsoft.com/winfx/2006/xaml/presentation"
        xmlns:x="http://schemas.microsoft.com/winfx/2006/xaml"
        xmlns:d="http://schemas.microsoft.com/expression/blend/2008"
        xmlns:mc="http://schemas.openxmlformats.org/markup-compatibility/2006"
        xmlns:local="clr-namespace:WpfApp5"
        mc:Ignorable="d"
        Title="MainWindow" SizeToContent ="WidthAndHeight">
    <StackPanel Width="Auto" Height="Auto" Margin="10">
        <local:UserControl1/>
        <local:UserControl1/>
        <local:UserControl1/>
    </StackPanel>
</Window>
[表示結果]
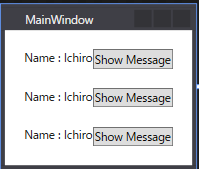
これですと、全部表示が同じですので、UserControlの外側から値を設定できるようにさせます。
(1) MainWindow.xaml書き換え
<Window x:Class="WpfApp5.MainWindow"
        xmlns="http://schemas.microsoft.com/winfx/2006/xaml/presentation"
        xmlns:x="http://schemas.microsoft.com/winfx/2006/xaml"
        xmlns:d="http://schemas.microsoft.com/expression/blend/2008"
        xmlns:mc="http://schemas.openxmlformats.org/markup-compatibility/2006"
        xmlns:local="clr-namespace:WpfApp5"
        mc:Ignorable="d"
        Title="MainWindow" SizeToContent ="WidthAndHeight">
    <StackPanel Width="Auto" Height="Auto" Margin="10">
        <local:UserControl1 DataContext="Ichiro"/>
        <local:UserControl1 DataContext="Jiro"/>
        <local:UserControl1 DataContext="Saburo"/>
    </StackPanel>
</Window>
(2) UserControl1.xaml書き換え
<UserControl x:Class="WpfApp5.UserControl1"
             xmlns="http://schemas.microsoft.com/winfx/2006/xaml/presentation"
             xmlns:x="http://schemas.microsoft.com/winfx/2006/xaml"
             xmlns:mc="http://schemas.openxmlformats.org/markup-compatibility/2006"
             xmlns:d="http://schemas.microsoft.com/expression/blend/2008"
             xmlns:local="clr-namespace:WpfApp5"
             mc:Ignorable="d"
             d:DesignHeight="300" d:DesignWidth="300" Name="parent">
    <StackPanel Orientation="Horizontal" DataContext="{Binding ElementName=parent}" Margin="10">
        <TextBlock Text="Name : "/>
        <TextBlock Text="{Binding DataContext}"/>
        <Button Content="Show Message"/>
    </StackPanel>
</UserControl>
[表示結果]
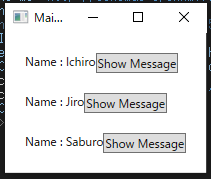
ここで、DataContext="{Binding ElementName=parent}"で、ElementNameプロパティにparentを指定することで、UserControlのUI要素をバインディング・ソースにしてデータ・バインディングを行えます。
StackPanel以下のUIアイテムから、上記のDataContextに対して、直接バインディングできるようです。
これは、コードが短くなります。
あと、上のxamlコードは次にようにも書き換えることができます。
RelativeSourceは、バインディング ターゲットの位置に対して相対的な位置を指定することにより、バインディング ソースを取得または設定します。
例えば {RelativeSource Self} は自身を参照し、{RelativeSource FindAncestor} では自分の要素を内包する、親の要素を対象に指定します。
以下は、UserControlを指定したパターン
<UserControl x:Class="WpfApp5.UserControl1"
             xmlns="http://schemas.microsoft.com/winfx/2006/xaml/presentation"
             xmlns:x="http://schemas.microsoft.com/winfx/2006/xaml"
             xmlns:mc="http://schemas.openxmlformats.org/markup-compatibility/2006"
             xmlns:d="http://schemas.microsoft.com/expression/blend/2008"
             xmlns:local="clr-namespace:WpfApp5"
             mc:Ignorable="d"
             d:DesignHeight="300" d:DesignWidth="300">
    <StackPanel Orientation="Horizontal" Margin="10">
        <TextBlock Text="Name : "/>
        <TextBlock Text="{Binding DataContext, RelativeSource={RelativeSource FindAncestor, AncestorType={x:Type UserControl}}}"/>
        <Button Content="Show Message"/>
    </StackPanel>
</UserControl>
http://yujiro15.net/YKSoftware/tips_DependencyProperty.html
需要はなさそうだけど、一応Gitにもコードを上げます。 github.com
Visual Studioのショートカットを覚えると、プログラミング時にとても便利です。
特に便利だと思ったのが、コードリーディング時に使用する
・定義へ飛んだ後、戻るときはCtrl + -
あと、コードスニペットも便利です。
C#のWPFで、依存関係プロパティを作成したい場合は、propdpで作成できます。(VS2017で確認済み)
ほかにもたくさんあるようです。 minus9d.hatenablog.com
MVVMを意識したWPFのプロジェクトを作成するのは結構大変です。もともとVisual Studioのプロジェクトで用意されているWPFプロジェクトは、MVVMを意識したプロジェクトになっていないためです。(´;ω;`)
そこで、自分で、プロジェクトのテンプレートを作成するのがらくちんです。
MVVMを意識したWPFのプロジェクトのひな形作成方法は以下のページが素晴らしいです。
http://yujiro15.net/YKSoftware/MVVM_Tree.html
<MVVMを意識したWPFプロジェクトひな形構成例>

プロジェクトテンプレート作成方法は、上記のようなプロジェクトのひな形を作成した状態で、
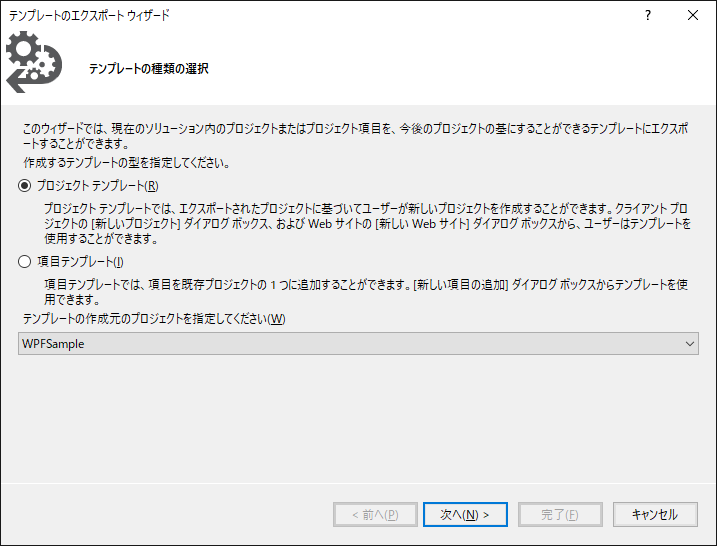
Visual Studio 2017のメニューのプロジェクトから、テンプレートのエクスポートを選択します。
プロジェクトのテンプレートをラジオボタンで選択します。
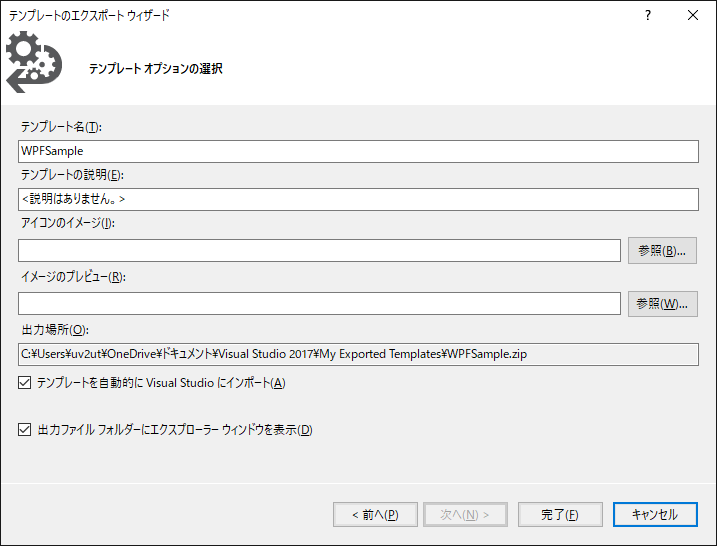
テンプレートオプション画面で、テンプレートの説明を入力した後、完了ボタンを押してください。
自作したプロジェクトテンプレートを、新しいプロジェクト作成時に使用できるようになります。
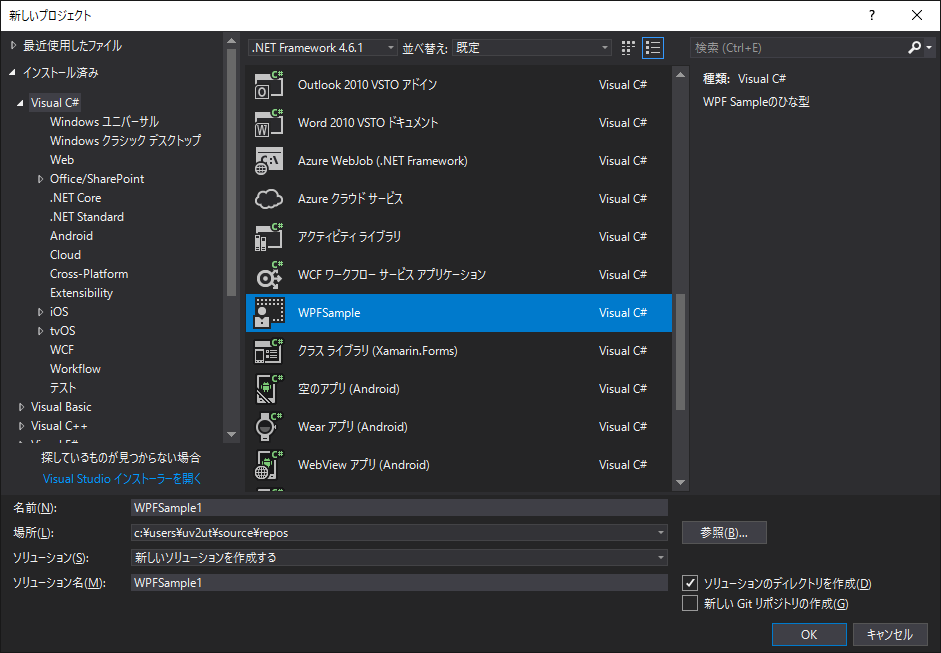
なお、NuGetで外部ライブラリ(例えばPrism.WPF)を登録することもできますので、プロジェクトを新規作成するたびに、NuGetで外部ライブラリをインストールする必要がなくなります。(とてもありがたい。)
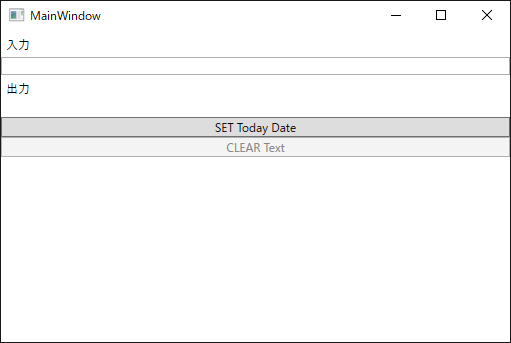
[MainWindowViewModel.cs]
using Reactive.Bindings;
using System;
using System.Linq;
using System.Reactive.Linq;

namespace ReactivePropertySample
{
    class MainWindowViewModel
    {
        public ReactiveProperty<string> Input { get; private set; }
        public ReactiveProperty<string> Output { get; private set; }
        public ReactiveCommand ClearCommand { get; private set; }
        public ReactiveCommand SetCommand { get; private set; }

        public MainWindowViewModel()
        {
            // ViewModelクラスのコンストラクタでReactiveProperty間の関連を定義

            // ReactivePropertyを作成する基本的な方法は、以下の2つ
            // 1. new演算子を使って生成する
            //    コンストラクタの引数にデフォルト値を指定する。指定しない場合は、その型のでデフォルト値が使われる)
            // 2. IObservable<T> に対してToReactiveProperty拡張メソッドを呼ぶ
            this.Input = new ReactiveProperty<string>(""); // デフォルト値を指定してReactivePropertyを作成
            this.Output = this.Input
                .Delay(TimeSpan.FromSeconds(1)) // 1秒間待機して
                .Select(x => x.ToUpper()) // 大文字に変換して
                .ToReactiveProperty(); // ReactiveProperty化する


            // CommandのExecuteが呼ばれたときの処理はSubscribeメソッドで指定します。
            // 先ほど作成したViewModelのInputプロパティが空じゃないときに、Inputプロパティを空にするCommandを追加したコードは以下のようになります。
            this.ClearCommand = this.Input
                .Select(x => !string.IsNullOrWhiteSpace(x)) // Input.Valueが空じゃないとき
                .ToReactiveCommand(); // 実行可能なCommandを作る

            // Commandの動作を定義する
            this.ClearCommand.Subscribe(_ => this.Input.Value = "");


            // 現在の日付を取得する
            DateTime dtToday = DateTime.Today;

            // 実行可能なCommandを生成する
            this.SetCommand = new ReactiveCommand();

            // Commandの動作を定義する
            this.SetCommand.Subscribe(_ => this.Input.Value += dtToday.ToString());
        }
    }
}
[MainWindow.xaml]
<Window x:Class="ReactivePropertySample.MainWindow"
        xmlns="http://schemas.microsoft.com/winfx/2006/xaml/presentation"
        xmlns:x="http://schemas.microsoft.com/winfx/2006/xaml"
        xmlns:d="http://schemas.microsoft.com/expression/blend/2008"
        xmlns:mc="http://schemas.openxmlformats.org/markup-compatibility/2006"
        xmlns:local="clr-namespace:ReactivePropertySample"
        mc:Ignorable="d"
        Title="MainWindow" Height="350" Width="525">

    <Window.DataContext>
        <local:MainWindowViewModel/>
    </Window.DataContext>

    <StackPanel>
        <Label Content="入力" />
        <TextBox Text="{Binding Input.Value, Mode=TwoWay, UpdateSourceTrigger=PropertyChanged}"/>
        <Label Content="出力" />
        <TextBlock Text="{Binding Output.Value}"/>
        <Button Content="SET Today Date" Command="{Binding SetCommand}" />
        <Button Content="CLEAR Text" Command="{Binding ClearCommand}" />
    </StackPanel>
</Window>
他のファイルは変更ありません。
MVVMとリアクティブプログラミングを支援するライブラリ「ReactiveProperty v2.0」オーバービュー blog.okazuki.jp
MVVMをリアクティブプログラミングで快適にReactivePropertyオーバービュー blog.okazuki.jp
以下のサイトにも記載があるように、WPFアプリケーションでMVVMのアプリケーションを作成するのは難しいと思います。
そのため、PrismというMVVM基盤ライブラリを使用します。
本アプリケーションでは、Prismを使用しているため、NuGetからPrism.Wpfというライブラリをプロジェクトにインストールしてください。


[MainWindow.xaml]
<Window x:Class="WpfApp3.MainWindow"
        xmlns="http://schemas.microsoft.com/winfx/2006/xaml/presentation"
        xmlns:x="http://schemas.microsoft.com/winfx/2006/xaml"
        xmlns:d="http://schemas.microsoft.com/expression/blend/2008"
        xmlns:mc="http://schemas.openxmlformats.org/markup-compatibility/2006"
        xmlns:local="clr-namespace:WpfApp3"
        mc:Ignorable="d"
        Title="MainWindow" Height="350" Width="525">
    <Grid>
        <Grid.RowDefinitions>
            <RowDefinition Height="1*"/>
            <RowDefinition Height="1*"/>
            <RowDefinition Height="1*"/>
            <RowDefinition Height="1*"/>
            <RowDefinition Height="1*"/>
            <RowDefinition Height="1*"/>
        </Grid.RowDefinitions>
        <TextBox Grid.Row="0" Text="{Binding LeftValue}" TextAlignment="Center" VerticalContentAlignment="Center"/>
        <Label Grid.Row="1" Content="+" HorizontalAlignment="Center" VerticalContentAlignment="Center"/>
        <TextBox Grid.Row="2" Text="{Binding RightValue}" TextAlignment="Center" VerticalContentAlignment="Center"/>
        <Label Grid.Row="3" Content="=" HorizontalAlignment="Center" VerticalContentAlignment="Center"/>
        <TextBox Grid.Row="4" Text="{Binding AnswerValue}" IsEnabled="False" TextAlignment="Center" VerticalContentAlignment="Center"/>
        <Button Grid.Row="5" Content ="足し算開始" Command ="{Binding CalcCommand , Mode=OneWay}"/>
    </Grid>
</Window>
MainWindowクラスのコンストラクタにおいて、DataContext にViewModelクラスのインスタンスを設定しています。
[MainWindow.xaml.cs]
using System.Windows;

namespace WpfApp3
{
    /// <summary>
    /// MainWindow.xaml の相互作用ロジック
    /// </summary>
    public partial class MainWindow : Window
    {
        public MainWindow()
        {
            InitializeComponent();

            this.DataContext = new ViewModel();
        }
    }
}
[ViewModel.cs]
using Prism.Commands;
using Prism.Mvvm;

namespace WpfApp3
{
    class ViewModel : BindableBase
    {
        public Model model;

        public ViewModel()
        {
            model = new Model();
        }

        private double _leftValue;
        public double LeftValue
        {
            get { return _leftValue; }
            set { this.SetProperty(ref this._leftValue, value); }
        }

        private double _rightValue;
        public double RightValue
        {
            get { return _rightValue; }
            set { this.SetProperty(ref this._rightValue, value); }
        }

        private double _answerValue;
        public double AnswerValue
        {
            get { return _answerValue; }
            set { this.SetProperty(ref this._answerValue, value); }
        }

        private DelegateCommand calcComamnd;
        public DelegateCommand CalcCommand
        {
            get { return calcComamnd = calcComamnd ?? new DelegateCommand(CalcExecute); }
        }

        private void CalcExecute()
        {
            AnswerValue = model.Calc(LeftValue, RightValue);
        }
    }
}
[Model.cs]
namespace WpfApp3
{
    class Model
    {
        public double Calc(double x, double y)
        {
            return x + y;
        }
    }
}