UIスレッド以外から、UIスレッドのコレクションにアクセスすると、エラーとなり、アクセスできない問題が発生します。
以下のサイトに、問題解決方法が記載してありました。
UIスレッド以外から、UIスレッドのコレクションにアクセスすると、エラーとなり、アクセスできない問題が発生します。
以下のサイトに、問題解決方法が記載してありました。
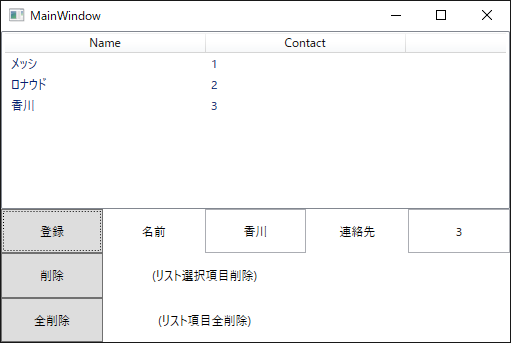
ObservableCollectionを使用して、登録と削除が可能なリストを持つアプリを作成します。
アプリには、登録、削除、全削除ボタンがあります。
名前と連絡先に文字列を入れて登録ボタンを押すと、データが登録されます。
リストの項目を選択して削除ボタンを押すと、選択した項目のデータが削除されます。
全削除ボタンを押すと、リストのデータがすべて削除されます。
ただし、列の横幅は、データの長さによって自動調整されません。(´;ω;`)
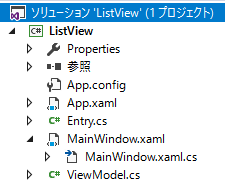
プロジェクト構成は以下のとおりです。
コードは以下のとおりです。
* MainWindow.xaml
<Window x:Class="ListView.MainWindow"
        xmlns="http://schemas.microsoft.com/winfx/2006/xaml/presentation"
        xmlns:x="http://schemas.microsoft.com/winfx/2006/xaml"
        xmlns:d="http://schemas.microsoft.com/expression/blend/2008"
        xmlns:mc="http://schemas.openxmlformats.org/markup-compatibility/2006"
        xmlns:local="clr-namespace:ListView"
        mc:Ignorable="d"
        Title="MainWindow" Height="350" Width="525">
    <Grid>
        <!-- 行を3つ定義 -->
        <Grid.RowDefinitions>
            <RowDefinition Height="4*"/>
            <RowDefinition Height="1*"/>
            <RowDefinition Height="1*"/>
            <RowDefinition Height="1*"/>
        </Grid.RowDefinitions>
        <!-- 列を3つ定義 -->
        <Grid.ColumnDefinitions>
            <ColumnDefinition Width="1*"/>
            <ColumnDefinition Width="1*"/>
            <ColumnDefinition Width="1*"/>
            <ColumnDefinition Width="1*"/>
            <ColumnDefinition Width="1*"/>
        </Grid.ColumnDefinitions>
        <ListView Name="lstEntry" ItemsSource="{Binding Path=Items}" Grid.Row="0" Grid.Column="0" Grid.RowSpan="1" Grid.ColumnSpan="5" >
            <ListView.View>
                <GridView>
                    <GridViewColumn Header="Name" DisplayMemberBinding="{Binding Path=Name}" Width="200"/>
                    <GridViewColumn Header="Contact" DisplayMemberBinding="{Binding Path=Contact}" Width="200"/>
                </GridView>
            </ListView.View>
        </ListView>

        <Button Content="登録" Grid.Row="1" Grid.Column="0" Click="Add_Click" />
        <Button Content="削除" Grid.Row="2" Grid.Column="0" Click="Remove_Click" />
        <Button Content="全削除" Grid.Row="3" Grid.Column="0" Click="RemoveAll_Click" />
        <Label Content="名前"  Grid.Row="1" Grid.Column="1" HorizontalAlignment ="Center" VerticalAlignment ="Center"/>
        <Label Content="連絡先" Grid.Row="1" Grid.Column="3" HorizontalAlignment ="Center" VerticalAlignment ="Center"/>
        <Label Content="(リスト選択項目削除)" Grid.Row="2" Grid.Column="1" Grid.ColumnSpan ="2" HorizontalAlignment ="Center" VerticalAlignment ="Center"/>
        <Label Content="(リスト項目全削除)" Grid.Row="3" Grid.Column="1" Grid.ColumnSpan ="2" HorizontalAlignment ="Center" VerticalAlignment ="Center"/>
        <TextBox Name="txtName" Grid.Row="1" Grid.Column="2" TextAlignment="Center" VerticalContentAlignment="Center"/>
        <TextBox Name="txtContact" Grid.Row="1" Grid.Column="4" Grid.ColumnSpan="2" TextAlignment="Center" VerticalContentAlignment="Center"/>
    </Grid>
</Window>
using System.Windows;

namespace ListView
{
    /// <summary>
    /// MainWindow.xaml の相互作用ロジック
    /// </summary>
    public partial class MainWindow : Window
    {
        private ViewModel viewModel = new ViewModel();

        public MainWindow()
        {
            InitializeComponent();

            this.DataContext = this.viewModel;
        }

        private void Add_Click(object sender, RoutedEventArgs e)
        {
            viewModel.AddPair(txtName.Text, txtContact.Text);
        }

        private void Remove_Click(object sender, RoutedEventArgs e)
        {
            viewModel.RemovePair(lstEntry.SelectedIndex);
        }

        private void RemoveAll_Click(object sender, RoutedEventArgs e)
        {
            viewModel.RemoveAllPair();
        }
    }
}
using System.Collections.ObjectModel;

namespace ListView
{
    public class ViewModel
    {
        public ObservableCollection<Entry> Items { get { return _Items; } }
        private ObservableCollection<Entry> _Items = new ObservableCollection<Entry>();

        public void AddPair(string k, string v)
        {
            _Items.Add(new Entry(k, v));

        }

        public void RemovePair(int n)
        {
            if ( (n >= 0) && (n < Items.Count) )
            {
                _Items.RemoveAt(n);
            }
        }

        public void RemoveAllPair()
        {
            _Items.Clear();
        }
    }
}
namespace ListView
{
    public class Entry
    {
        /// <summary>
        /// 名前
        /// </summary>
        public string Name { get; set; }

        /// <summary>
        /// 連絡先
        /// </summary>
        public string Contact { get; set; }

        /// <summary>
        /// コンストラクタ
        /// </summary>
        /// <param name="someName"></param>
        /// <param name="someContact"></param>
        public Entry(string someName, string someContact)
        {
            this.Name = someName;
            this.Contact = someContact;
        }
    }
}
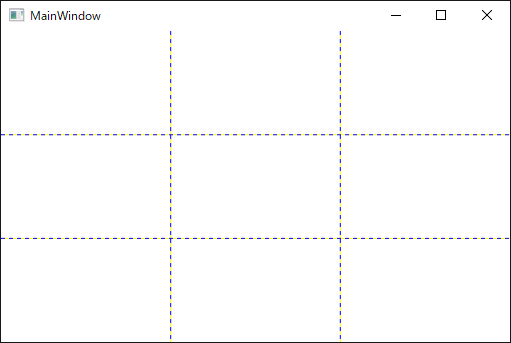
Gridコントロールを使えば、コントロールの配置を簡単に決めることできます。 3行、3列のGridを作成する場合は以下のように指定します。
<Window x:Class="GridBox.MainWindow"
        xmlns="http://schemas.microsoft.com/winfx/2006/xaml/presentation"
        xmlns:x="http://schemas.microsoft.com/winfx/2006/xaml"
        xmlns:d="http://schemas.microsoft.com/expression/blend/2008"
        xmlns:mc="http://schemas.openxmlformats.org/markup-compatibility/2006"
        xmlns:local="clr-namespace:GridBox"
        mc:Ignorable="d"
        Title="MainWindow" Height="350" Width="525">
    <Grid ShowGridLines="True">
        <!-- 行を3つ定義 -->
        <Grid.RowDefinitions>
            <RowDefinition Height="1*"/>
            <RowDefinition Height="1*"/>
            <RowDefinition Height="1*"/>
        </Grid.RowDefinitions>
        <!-- 列を3つ定義 -->
        <Grid.ColumnDefinitions>
            <ColumnDefinition Width="1*"/>
            <ColumnDefinition Width="1*"/>
            <ColumnDefinition Width="1*"/>
        </Grid.ColumnDefinitions>
    </Grid>
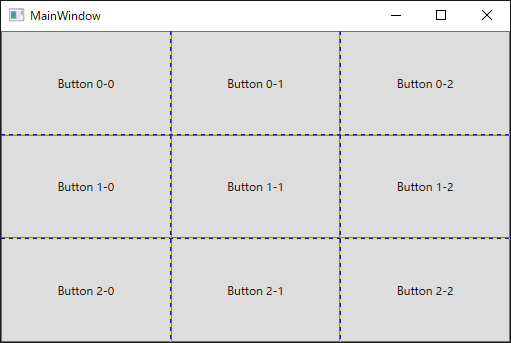
以下のように、Grid.RowとGrid.Columnを指定することで、Gridの意図した箇所にコントロールをセット可能です。
<Window x:Class="GridBox.MainWindow"
        xmlns="http://schemas.microsoft.com/winfx/2006/xaml/presentation"
        xmlns:x="http://schemas.microsoft.com/winfx/2006/xaml"
        xmlns:d="http://schemas.microsoft.com/expression/blend/2008"
        xmlns:mc="http://schemas.openxmlformats.org/markup-compatibility/2006"
        xmlns:local="clr-namespace:GridBox"
        mc:Ignorable="d"
        Title="MainWindow" Height="350" Width="525">
    <Grid ShowGridLines="True">
        <!-- 行を3つ定義 -->
        <Grid.RowDefinitions>
            <RowDefinition />
            <RowDefinition />
            <RowDefinition />
        </Grid.RowDefinitions>
        <!-- 列を3つ定義 -->
        <Grid.ColumnDefinitions>
            <ColumnDefinition />
            <ColumnDefinition />
            <ColumnDefinition />
        </Grid.ColumnDefinitions>

        <Button Content="Button 0-0" Grid.Row="0" Grid.Column="0" />
        <Button Content="Button 1-0" Grid.Row="1" Grid.Column="0" />
        <Button Content="Button 2-0" Grid.Row="2" Grid.Column="0" />
        <Button Content="Button 0-1" Grid.Row="0" Grid.Column="1" />
        <Button Content="Button 1-1" Grid.Row="1" Grid.Column="1" />
        <Button Content="Button 2-1" Grid.Row="2" Grid.Column="1" />
        <Button Content="Button 0-2" Grid.Row="0" Grid.Column="2" />
        <Button Content="Button 1-2" Grid.Row="1" Grid.Column="2" />
        <Button Content="Button 2-2" Grid.Row="2" Grid.Column="2" />
    </Grid>
</Window>
以下のように、Grid.RowSpanを設定することで、何行にわたって要素を置くか設定可能です。
また、Grid.ColumnSpanを設定することで、何列にわたって要素を置くか設定可能です。
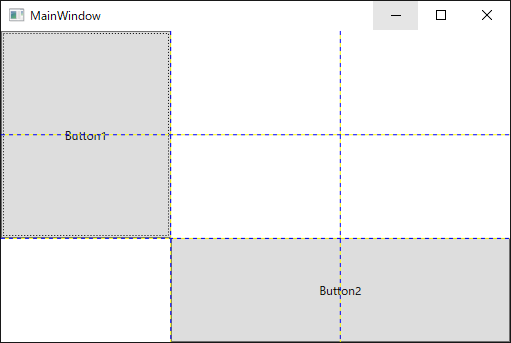
<Window x:Class="GridBox.MainWindow"
        xmlns="http://schemas.microsoft.com/winfx/2006/xaml/presentation"
        xmlns:x="http://schemas.microsoft.com/winfx/2006/xaml"
        xmlns:d="http://schemas.microsoft.com/expression/blend/2008"
        xmlns:mc="http://schemas.openxmlformats.org/markup-compatibility/2006"
        xmlns:local="clr-namespace:GridBox"
        mc:Ignorable="d"
        Title="MainWindow" Height="350" Width="525">
    <Grid ShowGridLines="True">
        <!-- 行を3つ定義 -->
        <Grid.RowDefinitions>
            <RowDefinition Height="1*"/>
            <RowDefinition Height="1*"/>
            <RowDefinition Height="1*"/>
        </Grid.RowDefinitions>
        <!-- 列を3つ定義 -->
        <Grid.ColumnDefinitions>
            <ColumnDefinition Width="1*"/>
            <ColumnDefinition Width="1*"/>
            <ColumnDefinition Width="1*"/>
        </Grid.ColumnDefinitions>

        <Button Content="Button1" Grid.Row="0" Grid.Column="0" Grid.RowSpan="2"/>
        <Button Content="Button2" Grid.Row="2" Grid.Column="1" Grid.ColumnSpan="2"/>
    </Grid>
</Window>
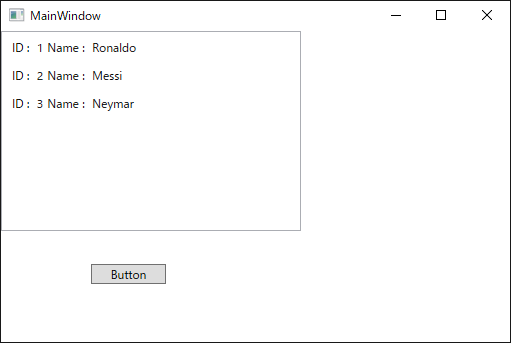
ObservableCollectionを使用すれば、簡単にバインディングを実現できます。
以下のサイトを参考にさせていただきました。
[Palyer.cs]
namespace WpfApp3
{
    public class Player
    {
        public int Id { get; set; }
        public string Name { get; set; }
    }
}
[MainWindow.xaml]
<Window x:Class="WpfApp3.MainWindow"
        xmlns="http://schemas.microsoft.com/winfx/2006/xaml/presentation"
        xmlns:x="http://schemas.microsoft.com/winfx/2006/xaml"
        xmlns:d="http://schemas.microsoft.com/expression/blend/2008"
        xmlns:mc="http://schemas.openxmlformats.org/markup-compatibility/2006"
        xmlns:local="clr-namespace:WpfApp3"
        mc:Ignorable="d"
        Title="MainWindow" Height="350" Width="525">
    <Canvas>
        <ListBox Name="Player" ItemsSource="{Binding}" Height="200" Width ="300">
            <ListBox.ItemTemplate>
                <DataTemplate>
                    <StackPanel Orientation="Horizontal" Margin="2">
                        <TextBlock Text ="ID : " Margin="2"/>
                        <TextBlock Text ="{Binding Id}" Margin="2"/>
                        <TextBlock Text ="Name : " Margin="2"/>
                        <TextBlock Text ="{Binding Name}" Margin="2"/>
                    </StackPanel>
                </DataTemplate>
            </ListBox.ItemTemplate>
        </ListBox>
        <Button Content="Button" Canvas.Left="90" Canvas.Top="233" Width="75" Click="Button_Click"/>
    </Canvas>
</Window>
[MainWindow.xaml.cs]
using System.Windows;
using System.Collections.ObjectModel;


namespace WpfApp3
{
    /// <summary>
    /// MainWindow.xaml の相互作用ロジック
    /// </summary>
    public partial class MainWindow : Window
    {

        ObservableCollection<Player> Players = new ObservableCollection<Player>();

        public MainWindow()
        {
            InitializeComponent();

            DataContext = this.GetPlayer();
        }


        public ObservableCollection<Player> GetPlayer()
        {
            Players.Add(new Player() { Id = 1, Name = "Ronaldo" });
            Players.Add(new Player() { Id = 2, Name = "Messi" });
            Players.Add(new Player() { Id = 3, Name = "Neymar" });

            return Players;
        }

        private void Button_Click(object sender, RoutedEventArgs e)
        {
            Players.Add(new WpfApp3.Player() { Id = 4, Name = "Bale" });
        }
    }
}
以下のページを参考にして、WPFのコレクションのデータバインディングを学習していきます。
よいページが見つかったので、紹介させていただきたいと思います。
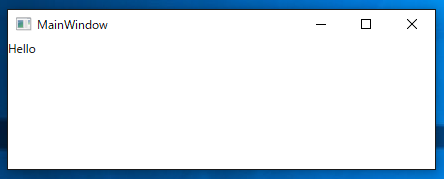
前回のコードをMVVMに直します。アプリ表示は、同一になります。
プロジェクト構成では、前回と比較して、ViewModel.csファイルを追加しました。
コード修正が入るファイルは、MainWindow.xaml.csファイルとMainWindow.xamlです。
前回と比較して、データコンテキストに設定するのは、Personクラスのインスタンスではなく、ViewModelクラスのインスタンスとなります。 また、xaml側で、データコンテキストを設定しています。
以下のサイトを参考にさせていただきました。 garafu.blogspot.jp
プロジェクト構成

アプリ表示
[ViewModel.cs]
namespace WpfApp1
{
    public class ViewModel
    {
        public Person Person { get; set; }

        public ViewModel()
        {
            this.Person = new Person();

            this.Person.Name = "Tom";
        }
    }
}
[MainWindow.xaml]
<Window x:Class="WpfApp1.MainWindow"
        xmlns="http://schemas.microsoft.com/winfx/2006/xaml/presentation"
        xmlns:x="http://schemas.microsoft.com/winfx/2006/xaml"
        xmlns:d="http://schemas.microsoft.com/expression/blend/2008"
        xmlns:mc="http://schemas.openxmlformats.org/markup-compatibility/2006"
        xmlns:local="clr-namespace:WpfApp1"
        xmlns:vm="clr-namespace:WpfApp1"
        mc:Ignorable="d"
        Title="MainWindow" Height="167.828" Width="443.238">
    <Window.DataContext>
        <vm:ViewModel />
    </Window.DataContext>
    <TextBlock Text="{Binding Person.Name}"/>
</Window>
[MainWindow.xaml.cs]
using System.Windows;

namespace WpfApp1
{
    /// <summary>
    /// MainWindow.xaml の相互作用ロジック
    /// </summary>
    public partial class MainWindow : Window
    {
        public MainWindow()
        {
        }
    }
}
[BindableBase.cs]
using System.Collections.Generic;
using System.ComponentModel;
using System.Runtime.CompilerServices;

namespace WpfApp1
{
    public class BindableBase : INotifyPropertyChanged
    {
        public event PropertyChangedEventHandler PropertyChanged;

        protected virtual void OnPropertyChanged([CallerMemberName]string propertyName = null) =>
            this.PropertyChanged?.Invoke(this, new PropertyChangedEventArgs(propertyName));

        protected virtual bool SetProperty<T>(ref T field, T value, [CallerMemberName]string propertyName = null)
        {
            if (EqualityComparer<T>.Default.Equals(field, value)) { return false; }
            field = value;
            this.OnPropertyChanged(propertyName);
            return true;
        }
    }
}
[Person.cs]
namespace WpfApp1
{
    public class Person : BindableBase
    {
        private string name;

        public string Name
        {
            get { return this.name; }
            set { this.SetProperty(ref this.name, value); }
        }
    }
}
Viewで起きたイベントをViewModelに伝える手段として、ICommandインタフェースがあるので、次はこれについて記載予定